_edited_edited.png)
This blog is a continuation of my previous blog, 'Building a CI/CD Pipeline Using GitHub Actions on AWS for a Spring Boot Application’.
What are profiles and how are environment variables useful?
Applications require different configurations for environments like development, staging, and production. The environments have varied database credentials and connection endpoints. Profiles help to differentiate environment-specific configuration thereby making the application flexible. Configurations specific to different profiles are placed in separate files. The naming convention application-{profile}.yml or application-{profile}.properties is followed for profile files.
Each environment or profile uses unique environment variables, which allows seamless switching between environments without changing the core application.
Environment variables define these configurations externally, allowing seamless switching between environments without modifying the core application. This is particularly useful in CI/CD workflows, where values for environment variables can be dynamically resolved during runtime to manage environment-specific configurations.
Prerequisites
Spring Boot Application: A working project with environment-specific configurations.
Running EC2 Instance: Java pre-installed (e.g., Java 17) to run the application.
Active Database Instance: An RDS database or equivalent configured on AWS.
Workflow File and GitHub Secrets: Properly set up in the repository.
Systemd Service: Active on the AWS EC2 instance for managing the application lifecycle.
AWS Management Console Access: Programmatic access enabled with deployment permissions.
Example Use Case in AWS
Scenario: Deploying a Spring Boot Application
Development: Use a local database with DB_HOST=localhost and DATABASE_NAME=LMS_DB.
Production: Use an RDS PostgreSQL instance with DB_HOST=mydb.amazonaws.com and DATABASE_NAME=aws_db.DATABASE_NAME=aws_db
Steps to Switch Profiles in CI/CD Deployment
1. Segregation of Profiles
To segregate different environments, we must use different profile names, such as application-local.yml and application-aws.yml. The configuration for the new profile, aws, is done in application-aws.yml The application-aws.yml is placed alongside application-local.yml, i.e. inside the src/main/resources directory in the application code.
The directory structure of the application code is as follows
Example (application-local.yml):
Update application-aws.yml to use environment variables.
The environment variables are placed inside { } for all the values that will be resolved during runtime
Below is the code snippet for DB configuration in application-aws.yml.
Example (application-local.yml):
By default, the local profile is activated if application.yml contains:
Modification in GitHub action workflow file
By default local profile is used for building as spring.profile.active is set to local. To switch the profile to aws, modify the maven build command in the workflow file (.github/workflows/<filename>.yml) as below.
Note that -D’spring.profiles.active”=aws flag is set to dynamically change the profile to aws while building the code in Github actions.
Add the parameters in SSM Parameter store in AWS
Next , we have to add the value of all the environment variables within the placeholders in AWS. For this, we can Secure Systems Manager(SSM) Parameter Store in AWS to securely store the value of the variables. In this use case, there are 5 environment variables, DB_HOST_AWS , DB_NAME_AWS, DB_PORT_AWS, DB_USERNAME_AWS, DB_PASSWORD_AWS.
• Navigate to AWS SystemsManager-> Parameter Store -> Create Parameter and add the parameter.
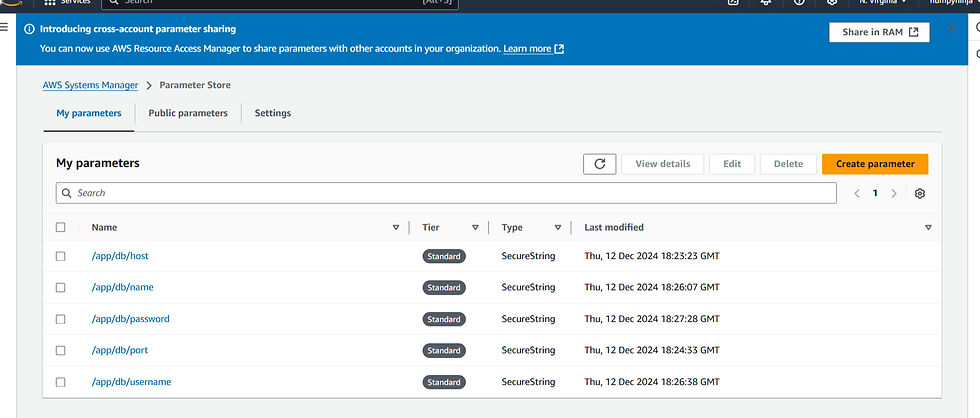
• It is a best practice to organize parameters hierarchically using a naming convention that reflects the application's structure and environment. Select the name, type , KMS source of the variable and add the corresponding value.

• Create a parameter (e.g., /app/db/host) and set its value to your DB_HOST_AWS, say,aws_db.
• Create a parameter (e.g., /app/db/port) and set its value to your DB_PORT_AWS, say,5432 for postgresql.
• Repeat for DB_PORT_AWS, DB_NAME_AWS, DB_USERNAME_AWS, and DB_PASSWORD_AWS.
Grant IAM Permission
Ensure the IAM role attached to your EC2 instance has permission to read from the Parameter Store.
If there is no role attached, create a role and attach it to EC2 instance.
a. Create IAM Role
• Go to the IAM Console in AWS Management Console.
• Navigate to Roles -> Create role.
• Select AWS service as trusted entity, and choose EC2 as the use case.

• Add the necessary policy, i.e. AmazonSSMFullAccess for SSM Parameter Store.

• Provide a name for the role (e.g., MyEC2Role) and finish the role creation process.
b. Attach role to EC2 instance
Go to EC2 console and select the instance to attach the role
Navigate to Actions -> Security -> Modify IAM Role.

In the IAM role dropdown, select the role (e.g., MyEC2Role).
Select Update IAM role.
6. Populate Environment Variables
If the application is started with a systemd service , add the following commands to a startup script , i.e. start-lms.sh. Since aws ssm commands involve shell logic, they should be executed in a script instead of directly in the systemd service file. Place the startup script in an appropriate location where the application environment is being prepared before the application starts. Thus, for our use case, place the start-lms .sh file in home/ec2-user directory.

By using export, all the environment variables required by the application (e.g., database host, port, username, password) are dynamically set at runtime. This ensures secure and flexible configuration management without hardcoding sensitive information in the application code or service files.
Example start-lms.sh script
Make the start-lms.sh script executable.
Modify the system service file
Update the lms-aws.service to call the start-lms.sh script
Reload and Restart the Service
After modifying the service file, reload the daemon and restart the service:
8. Verify Logs
Check the application logs to ensure the service is running and environment variables are resolved properly:
Application Log: /home/ec2-user/app.log
Error Log: /home/ec2-user/error.log
If configured correctly, the application will dynamically resolve the parameters at runtime.